Protocol for imaging through a multimode optical fibre
For citeable PDF versions of this document, please use the links below.
- DOI (concept): https://doi.org/10.5281/zenodo.3839326
- DOI (version): https://doi.org/10.5281/zenodo.3839327
- Authors: Raphaël Turcotte, Nigel J. Emptage, Martin J. Booth
- Licence: CC BY-NC-SA 4.0 (Attribution-NonCommercial-ShareAlike)
- Last modified: 5 yrs ago
The listed authors have participated in the writing of this document. As the content is the culmination of long term work in the Dynamic Optics and Photonics Group, many others have contributed directly or indirectly to this material. We consciously acknowledge all of these contributions, even though it is impractical to list them all here
1. Introduction
This experimental protocol describes several procedures related to the operation of an imaging system based on wavefront control and step-index multimode optical fibres (MMFs). It is assumed that such an imaging system is already built and aligned, without an MMF. This protocol aims at providing guidance to new users of the system by covering the following materials:
-
MMF-based imaging background
-
Preparation of MMF implants
-
MMF alignment
-
Transmission matrix and point quality
-
Bead imaging and PSF measurements
This document is written as much as possible for a generic MMF-based imaging system; minimal assumptions are made with regards to system configuration and components. At the same time, a detailed methodology is provided with explicit references to scientific articles in the hope of making published results more easily reproduceable.
2. MMF-based imaging background
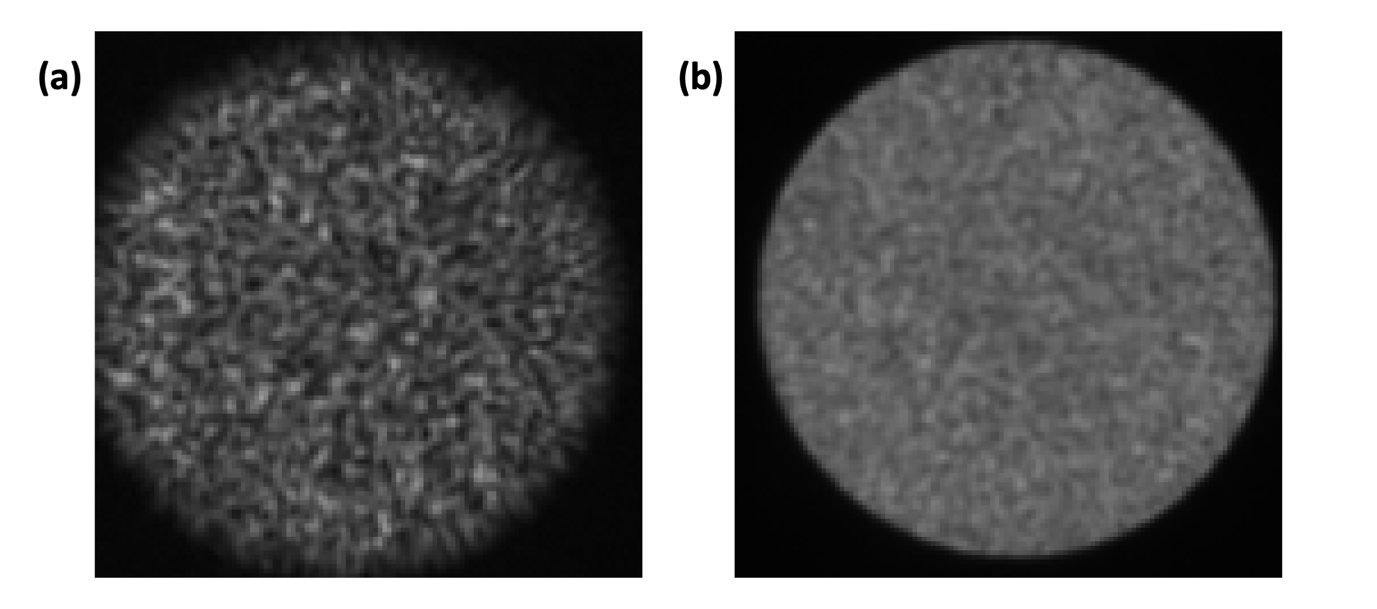
Theory of application: A single step-index MMF can be used as a micro-endoscope. The use of MMF-based imaging systems is of particular interest in neuroscience because MMFs have a smaller diameter than gradient index lenses, which minimises invasiveness. Also, MMFs support a high number of spatial modes and can achieve diffraction-limited resolution, which is necessary to study subcellular neuronal processes. Finally, MMFs are flexible and could potentially be used for imaging in freely moving mammals. Light is scrambled inside MMFs in an unpredictable manner and the output intensity pattern has a speckle-like appearance (Fig. 4.1). However, it is possible to control the intensity distribution at the output using wavefront control. By taking advantage of this, one can perform “digital” point-scanning microscopy by generating a sequence of wavefronts that will produce a focus at adjacent locations as in a raster scanning system.
Generic system description: The wavefront is shaped using a spatial light modulator (SLM), either a liquid-crystal SLM, a digital micromirror device, or a deformable mirror. Whether or not the design includes distinct physical units, the system can be described in a modular way as consisting of:
-
A source module: This module contains the laser source. Its primary function is to distribute the laser power to the other modules.
-
An imaging module: This module contains the SLM and relay optics to the MMF. Its primary function is to shape the wavefront entering the fibre. A point detector is typically included for detection of the epi-propagating signal.
-
A calibration module: This module contains a camera. Its primary function is to image the light field at the output (distal) facet of the MMF, especially during the calibration process in which the required wavefronts are determined. Configurations requiring a proximal camera will not be discussed. It is assumed in section 4 that there is a camera in the calibration module.
Of note, section 5 is more system specific, as it describes the optical system used in references [1], [2], and [3].
3. Preparation of MMF implants
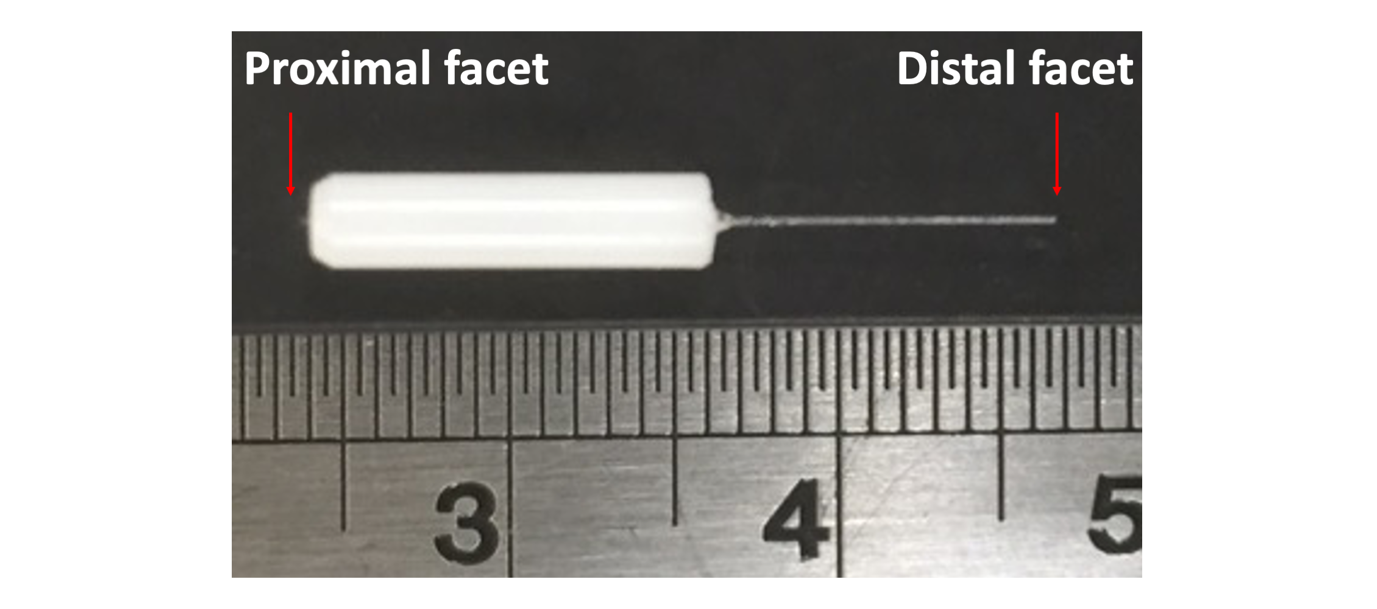
An implant is composed of a single MMF segment placed into a ferrule (Fig. 3.1). The ferrule is used to hold the MMF and to mount it into the optical system or onto the head of an animal. There are several types of MMFs. Some MMFs have a low numerical aperture (NA) and others have a higher NA. Diffraction theory still dictates the limit of spatial focusing and therefore the spatial resolution is still inversely proportional to the NA. Implants made with different MMFs are of preferred usage in different contexts depending on the NA and other properties.
3.1 Low NA fibre
Purpose: Low NA (0.22) step-index MMFs having adequate core and total diameters are affordable and easy to manipulate. They also support fewer spatial modes than large NA fibres and therefore require less computational power. They are preferred for use in the following contexts:
-
High resolution imaging is not the main priority. The spatial resolution achieved is sufficient for subcellular imaging.
-
The fluorescence signal expected is sufficiently high for detection within the limited solid collection angle.
-
A large number of fibre implants has to be used for development or testing; they are economical and can be rapidly made.
-
Proof-of-principle for a new numerical approach is helped by the smaller number of modes.
-
Proof-of-principle for a new one-photon excited fluorescence method is facilitated by the smaller number of modes.
Method: Low NA implants can be easily fabricated in the lab. The steps below describe how implants were prepared for the work performed in references [1] and [2].
-
Assemble the following items:
-
MMF (FG050UGA, Thorlabs): 0.22 NA, High-OH, Ø50 µm Core, Ø125 µm Cladding, Pure Silica / Fluorine-Doped Silica, Acrylate coating
-
Ferrules (CF128-10, Thorlabs)
-
Stripping tool (T06S13, Thorlabs)
-
Fibre cleaver (XL411, Thorlabs)
-
Bare Fibre Gripper (BFG1, Thorlabs)
-
Scissors, tweezers, and glue
-
-
Take the fibre roll and cut with scissors the length of fibre needed (about 25 cm).
-
Insert the fibre in the fibre stripping tool at the end away from the handles. While holding the fibre with the bare fibre gripper, take off the coating of the fibre by squeezing the handles and pulling the stripping along the fibre (without bending the fibre).
-
Use the fibre cleaver to cut a length of 2 cm of the fibre. A detailed procedure on the operation of the fibre cleaver is available on the vendor’s website.
-
Verify on a dissection scope that both facets of the fibre are sharp and unbroken.
-
Choose the appropriate ferrule for the fibre coating diameter. The bore diameter should be a bit larger than the cladding diameter of the fibre.
-
Clean the ferrule by blowing air through its middle opening. Otherwise, there tends to be a lot of dirt accumulating on the MMF facet, and it is hard to clean.
-
Place the fibre into the ferrule using tweezers. The ferrule has one end with a U-shaped opening. Insert the fibre from there. Let a length of less that 2 mm at the top of the ferrule. If the length at the top varies too much, it will be difficult to axially position the fibre during the centring process (see section 4.3).
-
Verify again on a dissection scope that both facets are intact.
-
Put one drop of glue at the bottom of the implant and let it dry, while holding the implant straight.
-
Repeat steps 3 to 9 to make multiple implants
-
Label the dish containing the fibres with the fibre part number; all implants look alike.
3.2 Moderate NA fibre
Purpose: Moderate NA (0.37) step-index MMFs having adequate core and total diameters can be purchased from specialised vendors. They support more spatial modes than low NA fibres and therefore require more computational power. They are of preferred usage in the following contexts:
-
The imaging application requires high spatial resolution. In equivalent conditions, they provide an improvement by a factor of 1.69 in spatial resolution compared to low NA fibres.
-
The expected fluorescence signal is limited and increasing the collection solid angle is necessary to achieve a sufficient signal-to-noise ratio.
-
A limited number of assays needs to be performed, or the same implant can be re-used for multiple measurements. Note: the same implant should not be used for imaging in different live animals.
-
The contrast mechanism is based on a nonlinear optical process (e.g. two-photon excited fluorescence, coherent anti-Stokes Raman scattering, etc).
-
Using a higher NA fibre is not possible due to limitation in computing power or the system is physically configured for low NA fibre.
Method: A moderate NA implant can be purchased from suppliers. It can also be fabricated in the lab. The fabrication is nevertheless more complicated as the fibres tend to be brittle. The fibres can also not be cut nicely without a specialised and expensive fibre cleaver. They can be cut manually with a diamond fibre scribe, but it is very hard to make a clean cut orthogonal to the main fibre axis. Considering the effort and time required, it was elected to buy implants from Doric Lenses for the work in ref. [3].
3.3 Knowing your MMF
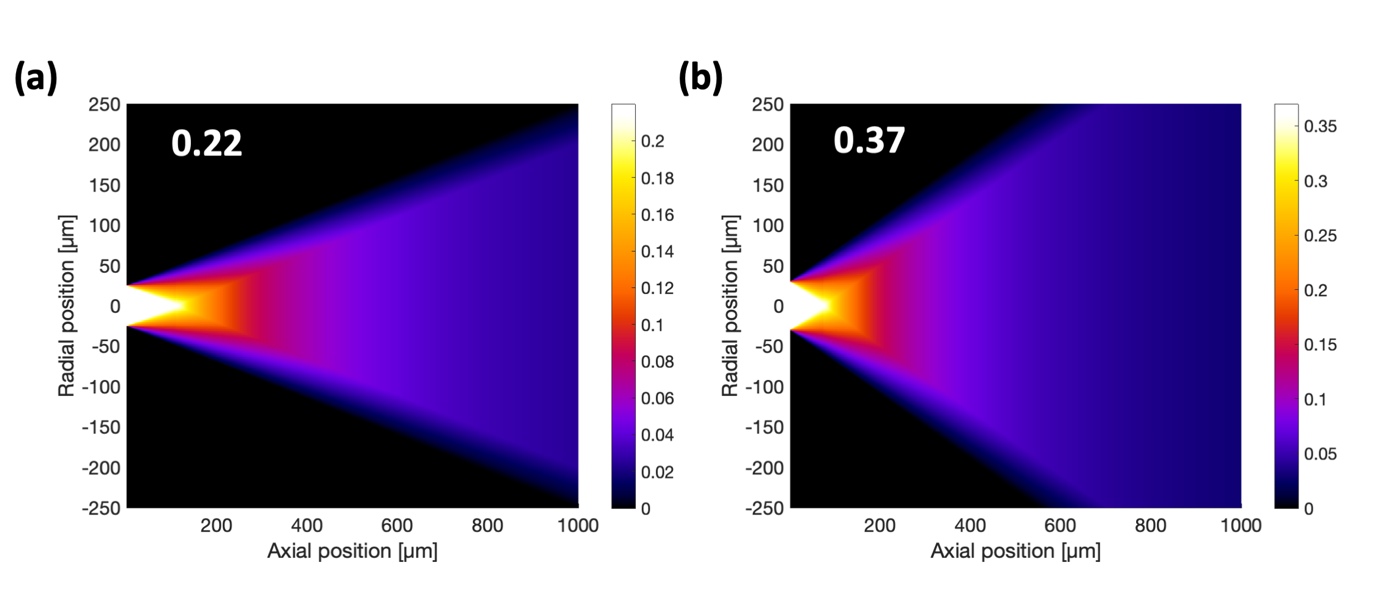
There are several parameters to consider when selecting an MMF that were not discussed above. One factor is that a standard doping agent is fluorite and that fluorite is fluorescent. Auto-fluorescence from the MMF is a major problem in a system that is limited by the signal-to-background ratio such as this one. Another factor is the distance from the distal facet at which the imaging plane will be located. Selecting a plane with minimal variations in the effective NA is desired to achieve a uniform illumination. These variations are fibre dependent as they are a function of the fibre geometry (core diameter) and the NA (Fig. 3.2).
4. MMF Alignment
It is critical that the MMF implant be correctly positioned into the imaging system. The positioning aims at coupling light into the fibre, conjugating the proximal facet with the wavefront shaping device, and aligning the distal facet with respect to the calibration module. Being careful in producing identical implants will significantly facilitate MMF positioning.
4.1 Pre-centre fibre
Purpose: In order to be able to align the MMF precisely with respect to the calibration unit, there must be some light going through the fibre such that signal can be detected by the camera during fibre alignment (see section 4.2).
Method: The steps below describe the preliminary, “rough” MMF positioning in the imaging module.
-
The implant is positioned into the imaging arm after the coupling lens on a ferrule mount (FCM/M, Thorlabs). In general, the lateral position is usually not very different between implants but repositioning the implant at the same axial position manually in the ferrule mount can be challenging.
Note: Care should be taken to install the implant such that the main axis of the MMF is parallel to the optical axis, i.e. the implant should not be tilted.
-
The laser is turned on and the wavefront is not shaped. A focused Gaussian beam should reach the proximal facet of the fibre.
-
The axial and laterally positions of the coupling lens are coarsely adjusted until light is visible at the distal end of the fibre. As appropriate measures need to be taken to ensure laser safety when undertaking this process, a power meter can be placed at the MMF distal end to detect when light is going through the fibre.
Note: Both the proximal and distal facet of the fibre are used as reference points. It is therefore simpler to adjust the relative position of the proximal facet by adjusting the coupling lens instead of the implant itself.
4.2 Align fibre
Purpose: The calibration module must be aligned with the imaging module.
Method: The distal facet of the MMF is imaged onto the camera within the calibration module. The following steps were used to align the calibration module in references [1], [2], and [3].
-
Position the imaging lens from the calibration module near the distal facet of the MMF. The distance should be slightly less than the working distance of the lens. Make sure the laser is turned off when installing the calibration module.
-
Turn on the laser. The wavefront is not shaped. A focused Gaussian beam should reach the proximal facet of the fibre. No reference beam should be present.
-
Using the full field-of-view (FOV) of the camera, translate the calibration module laterally until some signal is detected. Increasing the laser power might be necessary to detect signal.
-
Move the calibration module away from the imaging module until the MMF distal facet appears to be roughly in focus.
-
At this point, it is possible that most of the light is going through the cladding. If this is the case, an annulus is visible. This should be corrected by coarsely adjusting the lateral positions of the coupling lens until light is visible at the distal end of the fibre as circle.
-
Translate the calibration module laterally until the fibre is centred within the FOV.
-
Reduce the FOV of the camera to only the area covered by the output modes (see Fig. 4.1 and section 5) and refine the lateral positioning of the calibration module.
-
Refine the axial distance between the fibre and the calibration module. Looking at the edge of the core and trying to maximise contrast is the best strategy. This can be done with:
a. The beam as described in step 2. If the fibre is initially too well centred, it might be difficult to see sharp edges using this approach.
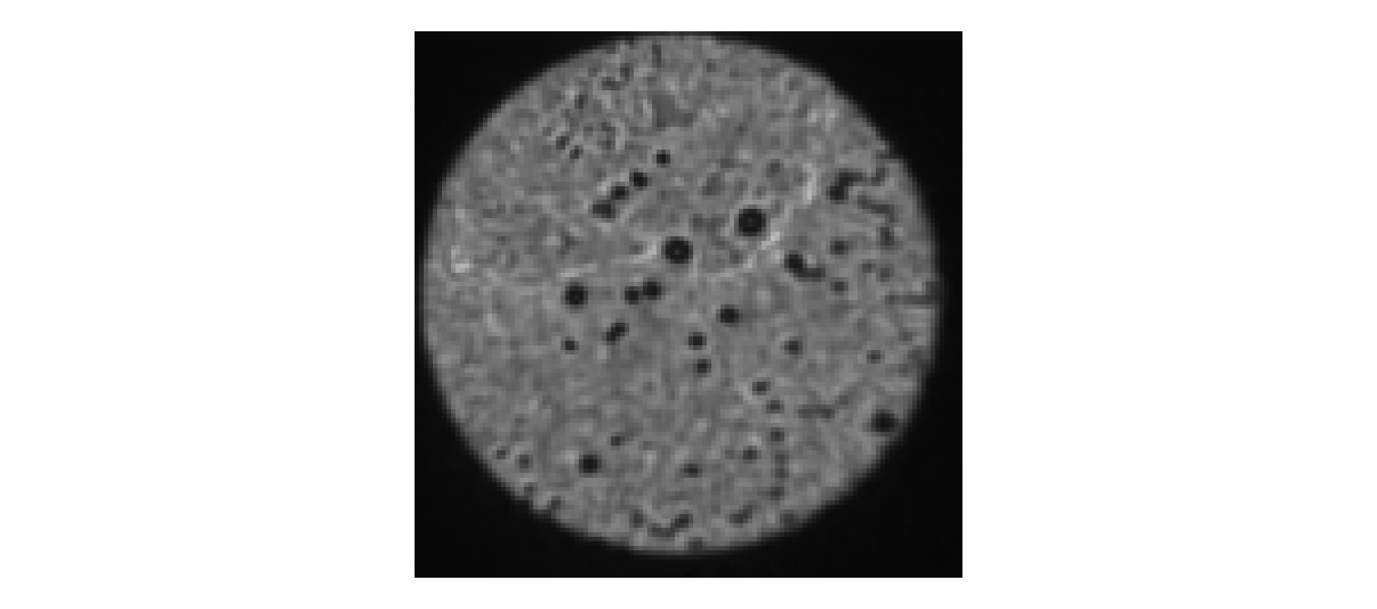
b. An alternative configuration is to generate a sequence of random wavefronts rapidly (10) and average the images together (Fig. 4.1(b)). Sharp edges will always be visible with this approach when the alignment is good, regardless of the centring. Note: Averaging images from a sequence of random wavefronts is also ideal for verifying that the distal facet is cleaned. If it appears dirty, it should be cleaned before performing the calibration (Fig. 4.2).
4.3 Centre fibre
Purpose: The fibre must be on the optical axis and well conjugated with the wavefront shaping device to achieve maximal coupling efficiency and optimal wavefront control.
Method: As the distal facet of the MMF is already aligned with the calibration module, it is not suitable to translate the implant with respect to the coupling lens. Instead, it is the coupling that is translated axially and laterally with respect to the implant. This alignment, termed centring, is the most challenging one and can be performed using two different measurement methods, and as such the procedure below should not necessarily be followed step-by-step. It is indeed usually better to iteratively and incrementally optimise the axial and lateral position of the coupling lens.
-
Although having only one method is sufficient to centre the fibre, it is very helpful to have two such methods in order to facilitate and accelerate the procedure.
a. A first method consists in scanning a point on the proximal facet using the wavefront shaping device and integrate the signal on the calibration module camera at each point to form an image of the proximal facet. (Method A)
b. The second method consists of capturing the intensity pattern at the distal facet using the calibration module camera. (Method B)
-
Each of the two methods has its limitations.
a. The speed of method A is limited by the update rate of the wavefront shaping device. The frame rate can be too slow for efficient guidance and thus centring.
b. Method B should be sufficiently fast for real-time guidance; the camera in the calibration module is likely capable of sub-second frame rates. It will however be more challenging to accurately align the coupling lens axially in comparison to method A.
-
Assess the overall quality of the centring before starting the alignment.
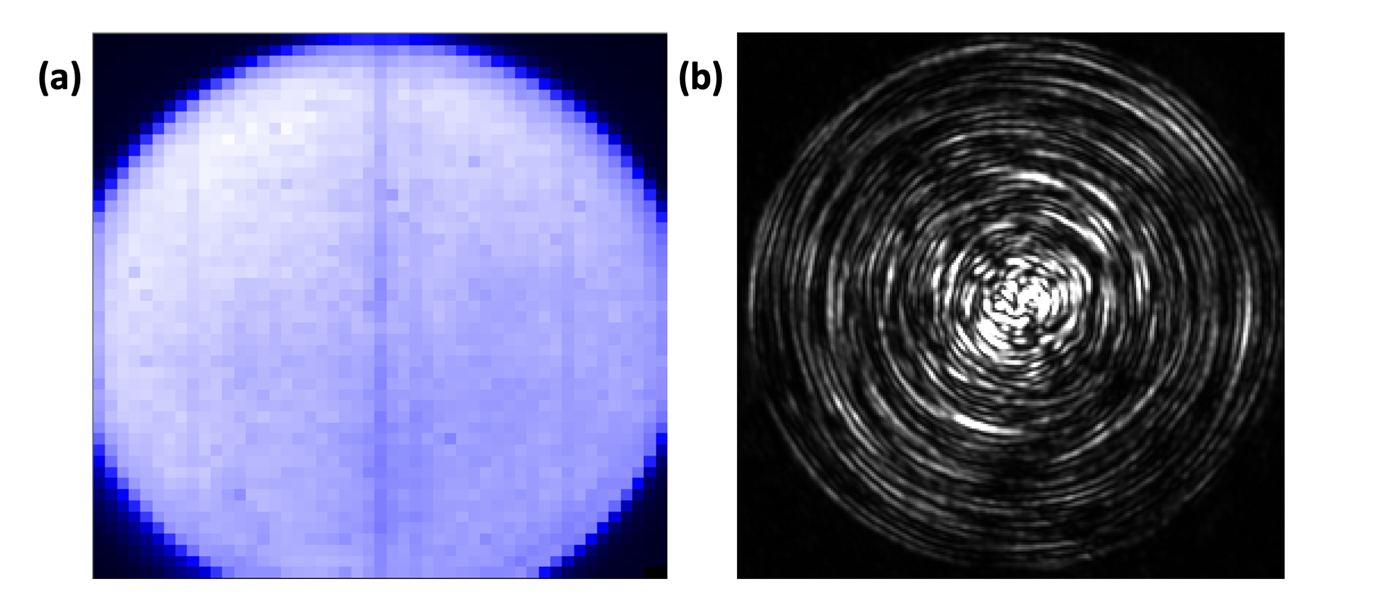
a. A well centred MMF under method A is shown in Fig. 4.3(a). A uniform signal is obtained throughout the core and its edge is sharp (high contrast).
b. A well centred MMF under method B is shown in Fig. 4.3(b). The physical eigenmodes of the MMF are visible as a series of concentric rings.
-
Minor axial alignment is needed:
a. If the edge of the core is visible under method A but not sharp. It should be noted that if the laser intensity is too high, the edge will always appear to blurry, even when in focus. The best contrast is achieved when a few pixels on the camera are saturated, i.e. when the full dynamic range of the camera is used. Method A is the preferred one.
b. The integrated signal detected using method B is maximal when the lens is in focus. However, it is challenging to determine the optimal position with this intensity measurement/evaluation; hence, method B is not preferred for performing the fine axial alignment.
c. Action 1: The coupling lens should sit in a mount with an actuator able to translate the lens along the optical axis. This actuator should be used for minor axial alignment.
Note: the implant can be tilted with respect to the optical axis. If this is the case, method A will show two opposite parts of the circular edge in focus while the other two will appear blurry. If this is the case, the implant needs to be repositioned.
-
Major axial alignment is needed:
a. If a uniform image is acquired using method A. Improving the alignment implies detecting some blurry edge.
Note: It is also possible to obtain a uniform image using method A if the lateral alignment is not optimal. It is worth verifying the lateral alignment before adjusting the position of the implant (see below).
b. If only a fraction of the expected power is going through the MMF. For this purpose, it is useful to know the expected throughput of the system as it makes it easier to recognise when this is the case. Improving the alignment implies increasing the intensity measured by the camera.
c. Action 1: The axial alignment can be improved first by adjusting the axial actuator as in step 4. If unsuccessful, the actuator should be returned to its centre position.
d. Action 2: The implant should be held by a ferrule mount (FCM/M, Thorlabs) or an equivalent apparatus. Move the implant up or down along the axial direction. If this is done, the procedure in section 4.2 should be repeated.
-
Lateral alignment is needed:
a. If the core of the fibre is not centred in the image acquired using method A.
b. If the eigenmodes (concentric circles) are not visible at every radial position. The outermost circles appear first, and more inward circle appear as the lateral alignment is improved. It is very challenging to obtain circles toward the centre of the fibre, but such minor lateral misalignment is not visible using method A and seems not to have an impact on the quality of the calibration (see section 5).
c. Action 1: The coupling lens should sit in a 2D translation mount. The translation screws should be used for lateral alignment.
Note: The proximal facet should be checked for dirt using method A. Dirt will look as in Fig. 4.2.
At the end of the process, it is a good practice to verify that the MMF distal facet is still aligned with the calibration module, and to optimise the alignment and centring iteratively, as needed.
5. Transmission matrix and point quality
Once the MMF and the calibration module are well aligned, the system is ready to be calibrated. The goal of the calibration is to determine the wavefronts required to generate desired intensity distributions at the distal facet of the MMF. Here we will focus on achieving diffraction-limited focusing for digital point-scanning. Several calibration methods can enable spatial focusing, but we will exclusively discuss the transmission matrix (TM) method as it was used in references in references [1], [2], and [3]. Evaluating the quality of the focus (point quality) is also very important and should be systematically done; this is also briefly discussed.
5.1 TM Evaluation
Purpose: As mentioned above, the goal of evaluating the TM is to determine the wavefronts required to generate a focus at different lateral positions within a plane at the MMF distal end. The TM describes the complex field transformation between two planes using a set of arbitrarily defined modes at each plane. For our specific configuration, input modes are generated by the SLM and are defined by their spatial position at the fibre input facet as an equidistant grid of points. The SLM is at a Fourier conjugate plane of the input facet. Output modes are also a grid defined by the CCD pixels. The rationale for this configuration is discussed in the primary literature and won’t be repeated here.
Method: Briefly, a phase-stepping approach is used to evaluate the TM. The input modes are generated sequentially, one at a time, with different phases. The output modes are observed simultaneously as a single camera frame. To measure the complex transformation, a reference beam is present and interfere with the fibre output. A regression is performed for each input-output pair to calculate the optimal phase at which constructive interferences are maximal at the output. 4 to 8 phase steps are necessary per input mode for accurate regression. The 2D matrix relating through phase input and output modes is the TM (as defined in this implementation). This algorithm should already be fully programmed and only the following steps are needed to set up the system for calibration:
-
Move the calibration and imaging modules apart from one another using a micrometric actuator by a distance corresponding to the location of the desired plane for imaging. In section 4, the distal facet was aligned to the calibration module as a reference. If the desired imaging plane is 50 µm from the MMF tip, move a module by 50 µm. The concentric rings should widen in accordance with the behaviour shown in Fig. 3.2.
-
Unblock the reference beam. The reference beam can go through the imaging module or be brought directly to the calibration module and combined using a non-polarising beam splitter.
Note: The later implementation was used in references [1], [2], and [3]. Preferably, the reference beam should not be perfectly copropagating with the MMF beam. When the two beams are co-propagating, it is challenging to evaluate the interference contrast because the maxima and minima will all reside in a uniform axial plane. Using a reference beam having an independent path allows to make the reference beam slightly divergent and non-copropagating with the MMF beam, which cause the interference pattern to rapidly cycle through the FOV and facilitate the evaluation of the interference contrast.
-
Evaluate the quality of the interference and suitability for calibration.
a. The camera in the calibration module should have no saturated pixels. Adjust the power going through the system accordingly.
b. The interference contrast should be high. If the contrast is low, adjust the relative power going into the MMF beam (imaging module) and reference beam (calibration module). If the contrast is still low, the issue is likely related to the relative polarisation of the two beams; describing the procedure for optimising the polarisation for the different beams is beyond the scope of this document.
c. The interference pattern should be temporally invariant (stable). If external vibrations are present, motion of the distal facet should also be visible without interference. It is useful to first check that the optical table is floating properly. If only the interference pattern is unstable, the issue is likely air currents. To achieve excellent calibrations, the air conditioning unit is turned off and the system fully enclosed. It can take several minutes for the system to stabilise. The calibration can be successful if the temporal variation in the interference pattern is slow with respect to the phase stepping measurements for a single input mode.
Note: It is useful to have these parameters automatically evaluated by the software.
-
Perform the calibration. There should be a single button to press.
-
Check the quality of the calibration (Point quality, section 5.2).
-
Once the calibration is done. Remove the calibration module from the system. Be careful not to touch the fibre or any other optical components in the imaging module.
5.2 Point quality recording
Purpose: The point quality refers to the characterisation of the illumination foci at the MMF distal end achieved with wavefront control. It is important to verify that the calibration was successful as even a small disruption during the TM evaluation can have a substantial impact on the quality of the calibration.
Method: The illumination spots can be imaged with the camera in the calibration unit.
-
Block the reference beam.
-
Inspect the point quality visually at different locations throughout the FOV.
a. Verify that the background is not too high relative to the peak intensity in focus.
b. Verify that the focus is occurring at the expected location. Drift has been observed and should be avoided.
c. Verify that the focus has the expected (diffraction-limited) size.
d. Verify that the above characteristics are maintained across the FOV and in accordance with the data presented in Fig. 3.2.
If the point quality doesn’t look good, redo the procedures described in section 4 and 5.1. If it is sufficiently good, proceed with the steps below.
-
Adjust the laser power such that the focus is not saturated on the camera at any locations.
-
Record an array of point quality for the records and potential postprocessing. This recording can be repeated with multiple optical density filters to generate a high dynamic range image.
6. Bead imaging and PSF measurements
Purpose: Fluorescent beads are an excellent training sample for learning how to use an MMF-based imaging system. They are also an ideal sample for testing the performance of a diffraction-limited imaging system. Beads are particularly useful to accomplish the following tasks:
-
Measure the point response of an MMF-based imaging system. Beads can be made such that their diameter is much smaller than the size of the illumination spot while being very bright.
-
Evaluate the signal-to-background ratio without contribution from fluorescence background from out-of-focus planes. The two-dimensional nature of a bead sample on a glass slide (i.e. beads rest in on plane) makes it possible to avoid the generation of out-of-focus fluorescence.
-
Evaluate the contribution to the background of fluorescent objects located in the focal plane but not within the focus. This background originates from the non-zero power outside the focus (see section 5.2).
Method: The steps below describe how beads samples were prepared in references [2] and [3].
-
Assemble the following items:
a. Fluorescent beads (Invitrogen): 1-µm yellow-green (505/515) beads were used in [2] and 2-µm red (580/605) beads were used in [3].
b. A microscope glass slide.
c. A pipette (5 µL).
-
Prepare the bead sample:
a. Take the bead solution out from the fridge.
Note: Beads should be kept in a dark cold environment.
b. Mix the solution of beads with a vortex mixer to separate them.
c. Pipette \<5 µL of the bead solution. Avoid pipetting from the bottom of the tube as more clumps will be present. Single beads are desired in the image. Diluting the stock bead solution to at least 1:100 is necessary to achieve the desired bead density.
d. Place the content of the pipette on a glass slide.
e. Let it dry for a few minutes.
Note: Do the sample preparation before the system start up and the calibration as the sample will need time to dry (about 60 min).
-
Install the bead sample into the system:
a. Execute the fibre positioning and the calibration steps as described above.
b. Attach the sample on the sample stage. Double-faced tape will help keeping the sample stable.
c. Position the sample stage under the imaging arm by paying attention that the sample is under the MMF.
d. Fix the sample stage on the table.
e. Move the sample axially until only a tiny gap remains between the fibre and the sample. It is better for the sample to be closer to the distal facet, and then to move the sample away, because of the short “working distance”.
-
Start the image acquisition software.
Note: The PMT is sensitive to ambient light. It is important to work in the dark and to cover the system to prevent environmental light from reaching the PMT.
-
Activate the point detector (e.g. photomultiplier tube).
-
Translate the sample axially to find the focal plane:
Note: Having a motorised actuator or piezo-electric stage to control the axial position of the sample is essential to find the focal plane.
a. If the intensity decreases, you are moving away from the focus. We want to use a small step size (2-5 µm) to find the focal plane; there is no system protection for the fibre when we move up and down with the software. The sample can enter in contact with the fibre, and the fibre break.
b. When individual beads begin to be visible, it is usefully to crop image to a single bead in the centre of the FOV. It accelerates the process (the wavefront shaping device can cause the frame rate to be slow) and avoids unnecessary photobleaching.
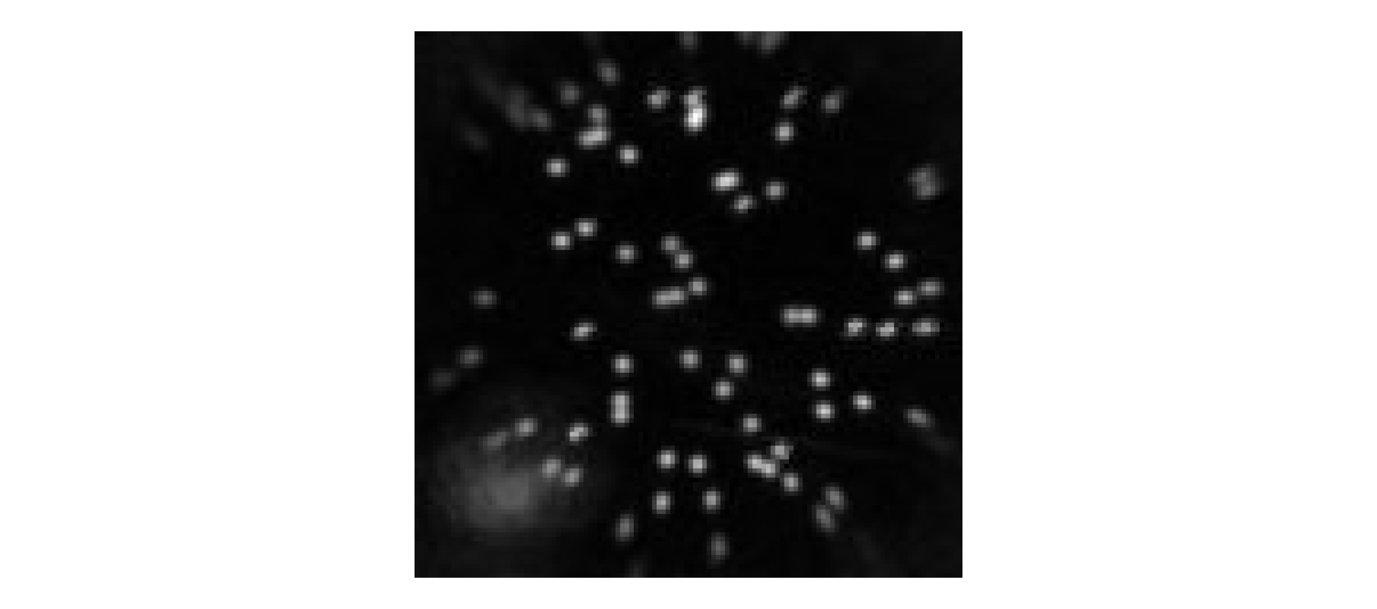
c. When the focus is found, return to acquire the full FOV (Fig. 6.1).
Note: Using a high laser power for step 6a can be very helpful because the signal from out-of-focus beads will be low compared to in focus beads. It is important to decrease the power as the sample is getting closer to the focal plane, especially when zoomed onto a single bead. This is to avoid photobleaching, which will make it look as if the sample is moving away from the focus, while it is in fact still getting closer to it.
Note: Increasing the power for imaging can sometime increase the signal-to-noise ratio, but often the system is limited by the signal-to-background. Even with an excellent calibration, there is still a non-zero contribution to background from objects within the focal plane but outside the focus.
7. References
-
Vasquez-Lopez SA, Turcotte R, Koren V, Plöschner M, Padamsey Z, Booth MJ, et al. Subcellular spatial resolution achieved for deep-brain imaging in vivo using a minimally invasive multimode fibre. Light Sci Appl. 2018;7(1):110. Link
-
Turcotte R, Schmidt CC, Emptage NJ, Booth MJ. Focusing light in biological tissue through a multimode optical fibre: refractive index matching. Opt Lett. 2019;44(10):2386–9. Link
-
Turcotte R, Schmidt CC, Booth MJ, Emptage NJ. Two-photon fluorescence imaging of live neurons using a multimode optical fibre. bioRxiv 2020.04.27.063388. Link

